Geeks in Phoenix

Geek Blog


Edit more types of text files with Textpad

In this article, I would like to share a handy application for text editing called TextPad. If you have ever used Notepad, you will love TextPad.

TextPad

Some of the features I like are spell checking, undo/redo capability, and a great search/replace engine. Here's a quote from their web site:

TextPad® is designed to provide the power and functionality to satisfy the most demanding text editing requirements. It can edit files up to the limits of virtual memory, and it will work with the 32-bit and 64-bit editions of Windows® 7, Vista, XP, 2000, Server 2003 and 2008.

TextPad has been implemented according to the Windows XP user interface guidelines, so great attention has been paid to making it easy for both beginners and experienced users. In-context help is available for all commands, and in-context menus pop-up with the right mouse button. The Windows multiple document interface allows multiple files to be edited simultaneously, with up to 2 views on each file. Text can be dragged and dropped between files.

In addition to the usual cut and paste capabilities, you can correct the most common typing errors with commands to change case, and transpose words, characters and lines. Other commands let you indent blocks of text, split or join lines, and insert whole files. Any change can be undone or redone, right back to the first one made. Visible bookmarks can be put on lines, and edit commands can be applied to lines with bookmarks.

Frequently used combinations of commands can be saved as keystroke macros, and the spelling checker has dictionaries for 10 languages.

It also has a customizable tools menu, and integral file compare and search commands, with hypertext jumps from the matched text to the corresponding line in the source file (ideal for integrating compilers).

TextPad is available on a try before you buy basis and is available for download at TextPad.com.

Use one monitor, keyboard and mouse on multiple computers with a KVM Switch

In this article, I show some of the advantages of using a KVM (Keyboard Video Mouse) Switch. Besides the obvious reasons of saving space and money when you have multiple computers in one area, you can also get some great built-in features with them.

First, you can get KVM switches with either VGA or DVI video connectors. I know that there are KVM's that have both VGA and DVI connectors, but I prefer VGA KVM's and use a DVI to VGA adapter when needed.

2-Port USB KVM Switch

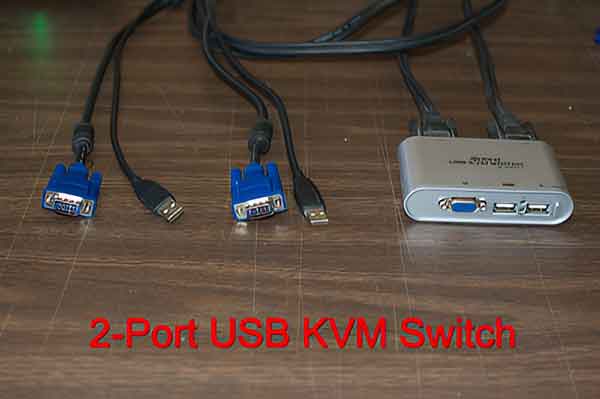
Here is your basic 2-port USB KVM Switch. It costs around $20-25. This type is quite handy when you have a desktop at home, and you use a laptop for work. You can connect the laptop to your full-size monitor, keyboard, and mouse when at home. Also, this unit does not require external power.

4-Port USB KVM Switch

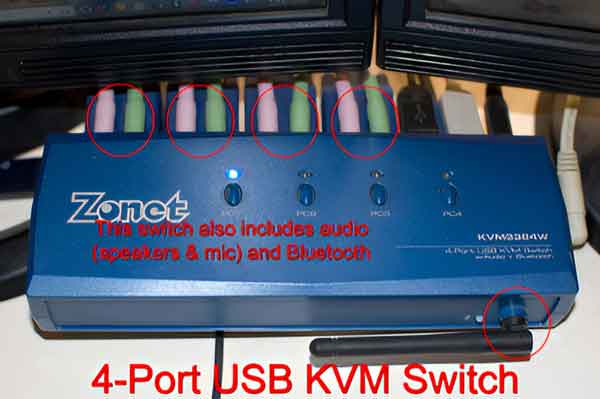
Here's a 4-port USB KVM Switch with Audio and Bluetooth. It costs around $40-50. Besides connecting a monitor, keyboard, and mouse, this one also has speaker and microphone jacks. Plus Bluetooth 2.0. This unit does not require external power, but it is an option.

8-Port USB / PS2 KVM Switch

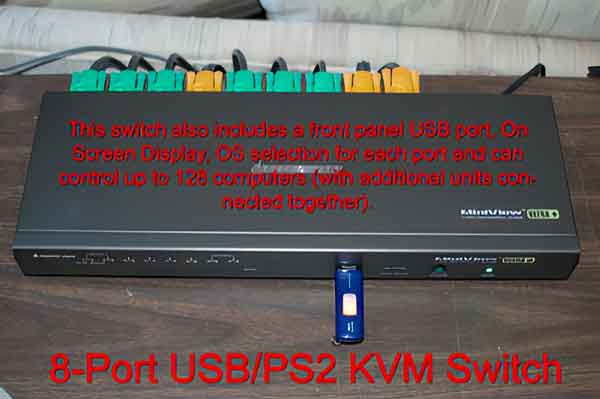
Here's 8-port USB / PS2 KVM with a USB port and On-Screen Display. This KVM is scalable and can control up to 128 computers (with additional switches). Each port can also be configured for the OS of the computer connected to it (Windows, Mac, Sun).

So, If your thinking about getting a KVM, with all the options available, you should be able to find one to fit your needs.

How to manually eject your computer CD / DVD drive tray

This article shows how to use the Eject Pin Hole to manually eject the tray on your computer's CD / DVD drive. There will be times when you need to open the tray on your computers CD / DVD drive when the system is powered off.

  • You need to boot your computer using the CD / DVD drive
  • You need to retrieve a disk without starting up the computer

Caution: Turn off power to the system before manually ejecting a disk.

All CD / DVD drives have an Eject Pin Hole. The only thing we need is a paper clip to use it (I am using a #1 size for this article).

All we need is a paper clip

All we have to do is bend it at the first curve 180 degrees (straitening it out). Then take the second curve and bend it 90 degrees. Now we need to locate the Eject Pin Hole.

Desktop CD / DVD drive Eject Pin Hole location

Desktop CD / DVD drives:
Gently insert the modified paper clip into the Eject Pin Hole until you feel it make contact with the gear underneath the tray. Firmly pressing inward, you will notice the tray to start to move out. Press inward until you have enough room to get your finger under the tray and then pull it out the rest of the way. If you can only get a small portion of the tray out, you can use the other end of the paper clip to gently pry open the tray enough to get your finger under it. Once done, gently push back the tray to the closed position. It will close firmly when the system is powered up.

Laptop - Notebook CD / DVD drive Eject Pin Hole location

Laptop - Notebook CD / DVD drives:
The trays on laptops/notebooks are spring-loaded, so all that is needed is to release the locking mechanism. You do not have to insert the paper clip as far as with a desktop CD / DVD drive, as you are not connecting to the gearing under the tray. Gently insert the paper clip into the Eject Pin Hole. Once you feel it make contact, gently push in, and the tray will eject immediately. Once done, gently push the tray back inward until it locks back into place.

RAW Image Viewers for Windows

When I migrated from Windows XP to Windows 7, one of the things I have missed is the Microsoft Powertoys. A couple of the functions have been integrated into Windows 7 (Open Command Window Here and Power Calculator). However, there are a few I am still looking for applications to replace them with.

One of them is the RAW Image Viewer. I am into digital photography and like to organize and work with digital RAW image files in Windows Explorer (much as you can with JPEG images). But Windows does not have support for this format built-in. Well, I am glad to say I have found a replacement for it.

FastPictureViewer is a free collection of 32 and 64-bit RAW Image Decoders for Windows XP, Windows Vista, Windows 7, Windows 8.1, and Windows 10.

Once installed, you have the same features for RAW image formats in Windows as you do with JPEG, BMP, PNG, GIF, and TIFF, complete with thumbnails in Explorer, preview, slide show support in Photo Gallery / Photo Viewer, and metadata search integration.

For more information and to download FastPictureViewer, please visit their web site.

Image Resizer Powertoy Clone for Windows

Updated October 13, 2020

When I migrated from Windows XP to Windows 7, one of the things I have missed is the Microsoft PowerToys. A couple of functions have been integrated into Windows 7 (Open Command Window Here and Power Calculator). However, there are a few I am still looking for applications to replace them with.

One of the applications you could integrate into Windows Explorer was Image Resizer. With a right-click on a picture, you could quickly resize a photo without opening an application. Well, I am glad to say I have found a replacement for it.

Image Resizer PowerToy Clone is, as its name implies, a clone of the original Microsoft PowerToy. Image Resizer has also been incorporated into the Windows 10 PowerToys.

Right-click on a photo and choose 'Resize Pictures' from the context menu.

Then select a size to make the pictures smaller, not larger, or to resize the originals, or make copies. Then click OK. It's that simple. And it's available in both 32 and 64-bit versions for Windows Vista and Windows 7.

For more information and to download Image Resizer PowerToy Clone for Windows, follow the links below.

Image Resizer for Windows 7 and Windows 8.1

Image Resizer (Windows 10 PowerToys) for Windows 10

Free computer diagnostics

Repairing a PC can sometimes be expensive, and that is why we offer free basic in-shop diagnostics. Give one of our professional and experienced technicians a call at (602) 795-1111, and let's see what we can do for you.

Check out our reviews

Geeks In Phoenix LLC, BBB Business Review

Customer service is #1

Here at Geeks in Phoenix, we take pride in providing excellent customer service. We aim to give the highest quality of service  from computer repair, virus removal, and data recovery.

Bring your computer to us and save

Repairing a computer can be time-consuming. That is why we base our in-shop service on the time we work on your computer, not the time it takes for your computer to work! From running memory checking software to scanning for viruses, these are processes that can take some time.

Contact us

If you have any questions, please feel free to give us a call at (602) 795-1111  and talk with one of our Geeks. Or you can send us a message from our contact page contact page , and one of our Geeks will get back to you as soon as possible. Or you can stop by and see us. Here are our hours and location.

Like Geeks in Phoenix on Facebook

Follow Geeks in Phoenix on Twitter

Watch Geeks in Phoenix on YouTube