Geeks in Phoenix

Geek Blog


Using search filters and keywords when searching in Windows 7

Searching in Windows 7 can be as simple as typing a few letters in the search box, but there are also advanced searching techniques that you can use. You don't have to know these techniques to search for your files, but they can be helpful depending on where your searching and what you're searching for.

Adding search filters

Search filters are a new feature in Windows 7 that makes searching for files by their properties (such as by author or by file size) much more straightforward.

To add a search filter to your search


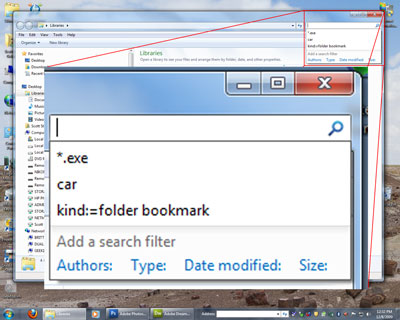
The search box in a folder or library

  1. Open the folder, library, or drive that you want to search.
  2. Click in the search box, and then click a search filter (for example, Date taken: in the Pictures library).
  3. Click one of the available options. (For example, if you clicked Date taken: choose a date or a date range.)

When you add a search filter, you'll notice that unigue keywords are automatically added to the search box. These keywords can help you refine your search by narrowing possibilities.

You can add multiple search filters to a search, or even mix search filters with standard search terms to further refine your search.

You can use two search filters to search for a picture tagged with "family" that was taken a long time ago.

Depending on where you're searching, only certain search filters are available. For example, if you're searching the Documents library, you'll see different search filters than you would in the Pictures library. You can't specify which search filters you'll see, but you can change the type of file a library is optimized for. This will, in turn, change which search filters are available when searching that library.

Using keywords to refine a search

When searching for a specific file, most people type the file's name in the search box. But you can also search for a file based on its contents or properties. Type "summer," for example, and it will find files named "sunset in summer.jpg," files tagged with "summer," and files with the word "summer" in the content. This broad approach to search usually helps you find your file quickly.

You can search by any file property. For example, if you know a file's type, you can enter the file extension ("JPG" for example) in the search box. Or, if you don't know the extension, you can type "document," "picture," or "music" to search for files of a specific kind.

If you want to search more selectively, you can type specific keywords (such as "Name:" or "Tag:") in the search box to specify which file property to search. This typically involves typing a property name followed by a colon and then typing a value. Here are some examples of search terms:

Example search term

Use this to

Name:Sunset

Find only files that have the word sunset in the file name.

Tag:Sunset

Find only files that are tagged with the word sunset.

Modified:05/25/2006

Find only files that were modified on that date. You can also type Modified:2006 to find files changed at any time during that year.

Another way to refine a search is to use Boolean filters to combine search words using simple logic. When you type Boolean filters such as AND or OR, you need to use all capital letters.

Boolean filter

Example search term

Use this to

AND

tropical AND island

Find files that contain both words "tropical" and "island" (even if those words are in different places within the file).

NOT

tropical NOT island

Find files that contain the word "tropical," but not "island."

OR

tropical OR island

Find files that contain either of the words "tropical" or "island."

Quotes

"tropical island"

Find files that contain the exact phrase "tropical island."

Parentheses

(tropical island)

Find files that contain both words "tropical" and "island" in any order.

>

date: > 01/05/06

Find files with an attribute more than or later than a specific value, such as after 01/05/06.

<

size: < 4 MB

Find files that have an attribute less than or earlier than a specific value, such as fewer than 4 MB. (You can also specify other sizes, such as KB and GB.)

You can even combine Boolean filters with other search terms. The following table shows how you can get very different results using the same search words but different Boolean filters. (Note how the use of parentheses can change the effect of a search term.)

Example search term

Use this to

author: Charlie AND Herb

Find files that are authored by Charlie as well as any files that include Herb in the file name or in any file property.

author: (Charlie AND Herb)

Find only files that are authored by both names.

author: "Charlie Herb"

Finds only files that are authored by someone with exactly this name.

Using natural language search

You can turn on Natural language search to perform searches in a simpler way, without using colons and without the need to enter AND and OR in capital letters. For example, compare these two searches:

Without natural language

With natural language

kind: music artist: (Beethoven OR Mozart)

music Beethoven or Mozart

kind: document author: (Charlie AND Herb)

documents Charlie and Herb

To turn on natural language search


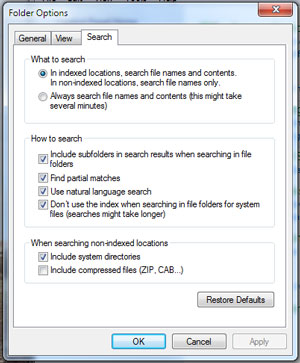
The Search tab under Folder Options

  1. Click on the Start menu, then Control Panel, then Appearance and Personalization, then Folder Options.
  2. Click the Search tab.
  3. Select the Use natural language search checkbox.

Even with natural language search turned on, you can continue to use the search box the same way. If you want to use Boolean filters or search keywords, you can. The difference is that you can also enter searches using a less formal method. Here are some examples:

  • e-mail today
  • documents 2006
  • author Susan
  • pictures vacation

Note:
When you turn on natural language search, some searches might give more results than you expect. For example, if you search for "e-mail today", you will see all messages sent today as well as any messages with the word "today" in the contents.

Perform faster searches using indexing options in Windows 7

Windows 7 uses the index to perform quick searches on your computer. Here are some advanced indexing settings you can change.

To add a file type to the index

If you use an unusual file type that's not currently recognized by the index, you can add it to the index so you can search in Windows 7 by that file type.

  1. Click the Start menu.
  2. In the Search box, type Indexing Options and select it when it appears.
  3. Click Advanced. If you're prompted for an administrator password or confirmation, type the password or provide confirmation.
  4. In the Advanced Options dialog box, click the File Types tab.
  5. In the Add new extension to list box, type the file name extension (for example, "txt"), and then click Add.
  6. Click Index Properties Only or Index Properties and File Contents, and then click OK.

To rebuild the index

The index requires almost no maintenance. However, if the index can't find a file that you know exists in an indexed location, you might need to rebuild the index. Rebuilding the index can take several hours, and searches might be incomplete until the index is fully rebuilt.

  1. Click the Start menu.
  2. In the Search box, type Indexing Options and select it when it appears.
  3. Click Advanced. If you're prompted for an administrator password or confirmation, type the password or provide confirmation.
  4. In the Advanced Options dialog box, click the Index Settings tab, and then click Rebuild. If you're prompted for an administrator password or confirmation, type the password or provide confirmation.

To index encrypted files

Before you add encrypted files to the index, we recommend that you have Windows BitLocker (or a non-Microsoft encryption program) enabled on your system drive (the drive that Windows is installed on).

Note:
Windows BitLocker is only included in Windows 7 Enterprise and Windows 7 Ultimate.

Note that the index will automatically rebuild each time this setting is changed. This can take a long time and might cause searches to be incomplete until the process is complete.

  1. Click the Start menu.
  2. In the Search box, type Indexing Options and select it when it appears.
  3. Click Advanced. If you're prompted for an administrator password or confirmation, type the password or provide confirmation.
  4. In the Advanced Options dialog box, click the Index Settings tab, select the Index encrypted files checkbox, and then click OK. If you're prompted for an administrator password or confirmation, type the password or provide confirmation.

Notes

  • Although you can use a non-Microsoft program to encrypt your system drive, non-Microsoft file encryption programs are not supported. Windows only supports files encrypted using the Encrypting File System (EFS).
  • EFS is only included in Windows 7 Enterprise, Windows 7 Professional, and Windows 7 Ultimate.
  • Suppose you add encrypted files to the index, and you're not using full-volume encryption for the location of the index, encrypted data from your files, for example. In that case, text from an encrypted Microsoft Word document will be added to the index. The index is obscured so that it's not easily readable if someone tries to open the index files, but it doesn't have strong data encryption. If someone were to gain access to your computer, they could extract your data from the index. Therefore, the location of the index should also be encrypted to help protect your indexed data.

To index words with and without diacritics as different words

Suppose you commonly use diacritics (small signs added to letters to change the pronunciation of words) in your file and folder names. In that case, you can configure the index to recognize words with diacritics differently. By default, Windows recognizes diacritics according to the language version you are using. If you change this setting, all diacritics will be recognized.

The index will automatically be rebuilt each time this setting is changed. This can take a long time and might cause searches to be incomplete until the process is complete.

  1. Click the Start menu.
  2. In the Search box, type Indexing Options and select it when it appears.
  3. Click Advanced. If you're prompted for an administrator password or confirmation, type the password or provide confirmation.
  4. In the Advanced Options dialog box, click the Index Settings tab.
  5. Under File Settings, select the Treat similar words with diacritics as different words checkbox, click OK, and then click OK again.

To change the location where the index is stored

If you need to free up space on a hard disk, you can change the index's location. If you change this location, the Windows Search service will automatically be restarted, and the change will not go into effect until the restart is complete.

  1. Click the Start menu.
  2. In the Search box, type Indexing Options and select it when it appears.
  3. Click Advanced. If you're prompted for an administrator password or confirmation, type the password or provide confirmation.
  4. In the Advanced Options dialog box, click the Index Settings tab.
  5. Under Index location, click Select new, click a new location, click OK, and then click OK again.

Note:
When you change the index location, you should choose a location on a non-removable hard disk formatted using the NTFS file system.

How to use the Command Prompt and Open Command Window Here in Windows 7

In this article, I will show how to use another one of my favorite applications, Command Prompt and Open Command Window Here.

What is Command Prompt / Command Window?

Command Prompt is a feature of Windows that provides an entry point for typing MS-DOS (Microsoft Disk Operating System) commands and other computer commands. The most important thing to know is that you can perform tasks on your computer without using the Windows graphical interface by typing commands. Command Prompt is typically only used by advanced users.

When you're using Command Prompt, the term command prompt also refers to the right angle bracket (>, also known as the greater than character), indicating the command line interface can accept commands. Other important information, such as the current working directory (or location) where the command will be run, can be included as part of the command prompt. For example, if you open the Command Prompt window and see the C:\> command prompt with a blinking cursor to the right of the right angle bracket character (>), the command you enter will be run on the entire C: drive of your computer.

How do I get to a Command Prompt?

There are three ways to get to a Command Prompt:

  • Click the Start button, then All Programs, then Accessories, then click on Command Prompt.

or

  • Click the Start button. In the search box, type Command Prompt, and then, in the list of results, click Command Prompt.

or

  • Hold down the Shift key while right-clicking on a folder in Windows Explorer and selecting Open command windows here from the context menu.

What commands can I run using Command Prompt?

You can run MS-DOS commands and other computer commands.

To view a list of common commands, type help at the command prompt, and then press Enter. To view more information about each of these commands, type help‌ command name, where command name is the name of the command you want more information about.

For a complete list of tasks and tools, you can use from the Command Prompt, click here.

How do I change the Command Prompt window?

You can change the appearance of the Command Prompt window by setting Command Prompt options.

To set Command Prompt options

  1. Open a Command Prompt.
  2. Right-click the title bar and do one of the following:
    • To change the settings for all Command Prompt windows, click Defaults.
    • To change the settings for the current Command Prompt window, click Properties.
  3. Select the options you want, and then click OK when you are done.

How do I run a command with elevated privileges?

Some commands that you can run using Command Prompt might require elevated or administrative privileges. To run these commands, you can use the Run as administrator command.

To run Command Prompt as an administrator

There are two ways to run a Command Prompt as an administrator:

  • Click the Start button, All Programs, then Accessories, right-click Command Prompt, and then click Run as administrator. If you're prompted for an administrator password or confirmation, type the password or provide confirmation.

or

  • Click the Start button. In the search box, type Command Prompt, and then, in the list of results, right-click Command Prompt, and then click Run as administrator. If you're prompted for an administrator password or confirmation, type the password or provide confirmation.

Modifying the default locations of user files and library properties in Windows 7

This article will show how to change the default locations of user files and modify the library properties in Windows 7. In a recent article, I showed the default locations for user files in Windows 7. But did you know you can modify them?

You can change the location of the folders in your personal folder (such as My Documents and My Pictures) by redirecting them. For example, if you have a large number of files in your My Documents folder, you might want to store the files on a different hard drive or on a network to free up space on your primary hard drive.

When you redirect a folder to a new location, you change where the folder and files are stored in the folder. However, you'll still be able to access the folder the same way you did before you redirected it.

Geek Tip:

  • Instead of redirecting a folder, you might want to consider including a folder in one of your libraries. For example, if you have a large number of pictures, you can store those pictures in a location other than your primary hard drive, then include that location in your Pictures library. For more information, see below.

To redirect a folder to a new location

  1. From the desktop, left-click on the File Explorer icon on the Taskbar or press the Windows logo key Windows logo key + E.
  2. Navigate to C:\Users\your user name\
  3. Right-click the folder that you want to redirect, and then click Properties.
  4. Click the Location tab, and then click Move.
  5. Browse to the location where you want to redirect this folder. You can select another location on this computer, another drive attached to this computer, or another computer on the network. To find a network location, type two backslashes (\\) into the address bar followed by the name of the location where you want to redirect the folder (for example, \\mylaptop), and then press Enter.
  6. Click the folder where you want to store the files, click Select Folder, and then click OK.
  7. In the dialog that appears, click Yes to move all the files to the new location.

To restore a folder to its original location

  1. From the desktop, left-click on the File Explorer icon on the Taskbar or press the Windows logo key Windows logo key + E.
  2. Navigate to C:\Users\your user name\
  3. Right-click the folder that you previously redirected and want to restore to its original location, and then click Properties.
  4. Click the Location tab, click Restore Default, and then click OK.
  5. Click Yes to recreate the original folder, and then click Yes again to move all the files back to the original folder.

Note:

  • If you don't see the Location tab in a folder's Properties dialog, then the folder can't be redirected. If you see the Location tab but can't edit the folder path, you don't have permission to redirect it.

We are all familiar with files and folders, but with the release of Windows 7, we now have another way to manage them, Libraries. Libraries are where you go to manage your documents, music, pictures, and other files. You can browse your files the same way you would in a folder, or you can view your files arranged by properties like date, type, and author.

In some ways, a library is similar to a folder. For example, when you open a library, you'll see one or more files. However, unlike a folder, a library gathers files that are stored in several locations. This is a subtle but significant difference. Libraries don't hold your items. They monitor folders that contain your items and let you access and arrange the items in different ways. For instance, if you have music files in folders on your hard disk and an external drive you can access all of your music files at once using the Music library.

Windows 7 has four default libraries: Documents, Music, Pictures, and Videos. You can also create new libraries.

Here are some ways you can modify an existing library:

  • Include or remove a folder. Libraries gather content from included folders or library locations. You can include up to 50 folders in one library.
  • Change the default save location. The default save location determines where an item is stored when copied, moved, or saved to the library.
  • Change the type of file a library is optimized for. Each library can be optimized for a specific file type (such as music or pictures). Optimizing a library for a specific file type changes the available options for arranging your files.

To change a library's default save location

A library's default save location determines where an item will be stored when it's copied, moved, or saved to the library.

  1. From the desktop, left-click on the File Explorer icon on the Taskbar or press the Windows logo key Windows logo key + E.
  2. Open the library you'd like to change.
  3. In the library pane (above the file list), next to Includes, click Locations.
  4. In the Library Locations dialog box, right-click a library location that's not currently the default save location, click Set as default save location, and click OK.

To change the type of file a library is optimized for

Each library can be optimized for a specific file type (such as music or pictures). Optimizing a library for a specific file type changes the available options for arranging the files in that library.

  1. From the desktop, left-click on the File Explorer icon on the Taskbar or press the Windows logo key Windows logo key + E.
  2. Right-click the library you'd like to change, and then click Properties.
  3. In the Optimize this library for list, click a file type and then click OK.

Using Remote Desktop Connection on a Netbook

In this article, I would like to show you how to use Remote Desktop Connection. With Remote Desktop Connection, you can have access to a Windows session that is running on your computer when you are on another computer. For example, this means that you can connect to your work computer from home and have access to all of your programs, files, and network resources as though you were sitting at your computer at work. You can leave programs running at work, and when you get home, you can see your work desktop displayed on your home computer, with the same programs running.

When you connect to your computer at work, Remote Desktop automatically locks that computer so that no one else can access your programs and files while you are gone. When you come back to work, you can unlock your computer by pressing CTRL+ALT+DEL.

You can keep your programs running and preserve the state of your Windows session while another user is logged on. When that user logs off, you can reconnect to your session in progress.

And you can even connect two computers running different operating systems. In the following video, I use a Netbook running Windows XP Professional to connect to a workstation running Windows 7.

Note: This video was captured at 1366x768 (using a netbook)

With Fast User Switching, you can easily switch from one user to another on the same computer. For example, suppose you are working at home and have logged on to the computer at your office to update an expense report. While you are working, a family member needs to use your home computer to check for an important e-mail message. You can disconnect Remote Desktop, allow the other user to log on and check e-mail, and then reconnect to the computer at your office, where you will see the expense report exactly as you left it. Fast User Switching works on standalone computers and computers that are members of workgroups.

Remote Desktop can be used in many situations, including:

  • Working at home. Access work in progress on your office computer from home, and have full access to all local and remote devices.
  • Collaborating. Access your desktop from a colleague's office to work together on projects such as updating a slide presentation or proofreading a document.
  • Sharing a console. Allow multiple users to maintain separate program and configuration sessions on a single computer, such as a teller station or a sales desk.

To use Remote Desktop Connection

  • A computer ("host" computer) running Windows XP Professional with Service Pack 2, Windows Server 2003 with Service Pack 2, Windows Vista, Windows Server 2008, Windows 7, Windows 8.1, and Windows 10 ("remote" computer) with a connection to a local area network (LAN) or the Internet.
  • A second computer ("client" computer) with access to the LAN via a network connection, modem, or virtual private network (VPN) connection. This computer must have Remote Desktop Connection installed.
  • Appropriate user accounts and permissions.

Note: If you have Windows XP Service Pack 3 installed, the CredSSP protocol is turned off by default. You will need to enable it to use Network Level Authentication (NLA), which is recommended.

Free computer diagnostics

Repairing a PC can sometimes be expensive, and that is why we offer free basic in-shop diagnostics. Give one of our professional and experienced technicians a call at (602) 795-1111, and let's see what we can do for you.

Check out our reviews

Geeks In Phoenix LLC, BBB Business Review

Customer service is #1

Here at Geeks in Phoenix, we take pride in providing excellent customer service. We aim to give the highest quality of service  from computer repair, virus removal, and data recovery.

Bring your computer to us and save

Repairing a computer can be time-consuming. That is why we base our in-shop service on the time we work on your computer, not the time it takes for your computer to work! From running memory checking software to scanning for viruses, these are processes that can take some time.

Contact us

If you have any questions, please feel free to give us a call at (602) 795-1111  and talk with one of our Geeks. Or you can send us a message from our contact page contact page , and one of our Geeks will get back to you as soon as possible. Or you can stop by and see us. Here are our hours and location.

Like Geeks in Phoenix on Facebook

Follow Geeks in Phoenix on Twitter

Watch Geeks in Phoenix on YouTube