Geeks in Phoenix

Geek Blog


Take your office to the cloud with Microsoft Office Web Apps

Microsoft recently introduced Office Web Apps, a cloud-based version of their popular productivity suite. Office Web Apps is part of Microsoft 365 and includes versions of Word, Excel, PowerPoint, and OneNote. You can create, edit, copy, rename and delete files (via OneDrive, see below).

With Office Web Apps and OneDrive, you can also share your files with friends, co-workers, or clients. You can even work simultaneously with others on the same Excel workbook with Office Web Apps. Or you can embed an interactive PowerPoint presentation or Excel spreadsheet into a web page.

View of files inside Microsoft Office Web Apps

Excel Web App running in a browser window

And if you have Microsoft Office installed on your current system, you can open documents directly to that program. If you are using Office 2003 or Office XP, you will need the Microsoft Office Compatibility Pack. Also, Office Web Apps have limited functionally, and some of the more advanced features of the desktop programs, like Comments in Excel, do not work.

Here's a quote from their website:

INTRODUCING OFFICE WEB APPS.
Work online, anytime, from almost anywhere!

  • Office Web Apps are compatible with just about any version of Office.
  • Office Web Apps save your formatting - no matter how often you edit online or take it back into Office on your PC or Mac.
  • Office Web Apps are ready wherever you are - work from the office, your home, the airport, a coffee shop ... or France.

Microsoft OneDrive

Store, access, and share thousands of documents, photos, and Microsoft Office files on OneDrive. OneDrive password-protects your files, so you control who has access to them.

For more information on Microsoft Office Web Apps or Microsoft OneDrive, follow the links below:

Microsoft Office Web Apps

Microsoft OneDrive

Geek Notes:

  • Office Web Apps is integrated into Office 2010
  • Office Web Apps is built into Microsoft 365, so you will need a Microsoft account to use them
  • OneDrive Basic plan has 5GB of storage space for free and paid plans with up to 1TB of storage

My favorite left hand Windows keyboard shortcuts

Updated April 19, 2023

One of the most useful items I use daily is keyboard shortcuts. Especially shortcuts that I can perform with just my left hand, allowing me to keep my right hand on the mouse. You can use keyboard shortcuts to open frequently used files, folders, and programs like File Explorer. Windows has a ton of built-in keyboard shortcuts (see links at the bottom of this article), plus you can create your own custom keyboard shortcuts. Here are my favorite left-hand keyboard shortcuts.

Left hand Windows keyboard shortcuts

Press To
Windows logo key + E Open File Explorer
Windows logo key + R Open the Run dialog box
Windows logo key + D Display the Desktop
Windows logo key + F Search for a file or folder (Windows 7 / 8.1)
Windows logo key + S Search for a file or folder (Windows 10 / Windows 11)
CTRL + A Select all
CTRL + X Cut
CTRL + C Copy
CTRL+ V Paste
CTRL + ALT + (KEY) Custom keyboard shortcut (see below)

Create your own Windows keyboard shortcuts

You can create keyboard shortcuts that use CTRL + ALT + (your choice of a key) for frequently used files, folders, and programs. You will need to have a shortcut to the file, folder, or program you want to open first. You can use an existing shortcut (on your desktop or the Start menu) or create a new one.

How to create a shortcut in Windows

Once you have a shortcut:

  1. Right-click on the shortcut
  2. From the context menu, click Properties
  3. On the Properties box, select the Shortcut tab
    The shortcut key box inside of a Windows shortcut
  4. Click inside the Shortcut key box and press the key which you want to combine with CTRL + ALT

Note:
You can not use the following keys for keyboard shortcuts: ESC, ENTER, TAB, SPACEBAR, PRINT SCREEN, SHIFT, or BACKSPACE.

For more information on Windows keyboard shortcuts, follow the links below:

Windows 11 keyboard shortcuts

Windows 10 keyboard shortcuts

Windows logo key keyboard shortcuts

General keyboard shortcuts

Natural keyboard shortcuts

Dialog box keyboard shortcuts

Accessibility keyboard shortcuts

Windows Explorer keyboard shortcuts

Stitching panoramic images for the web with Microsoft Research HD View

A while back. I wrote an article about creating panoramic images with Microsoft Image Composite Editor (ICE) and Photosynth. With ICE and Photosynth, you can create panoramic images and then upload them to the Photosynth website. But what if you wanted to upload them to your website? That's where HD View comes into the picture.

Microsoft HD View is a new viewer to display large images (gigapixels) across the internet. It allows you to create panoramic images for web pages that do not take a lot of bandwidth. When someone views the image, they are only downloading what is required for that view. It is only when they pan or zoom that more of the image is downloaded. HD View / Deep Zoom is now included in ICE, also as a stand-alone command-line utility, and (here's the best), a Photoshop plug-in.

HD View / Deep Zoom export in Microsoft Image Composite Editor

HD View / Deep Zoom export in Photoshop plug-in

So if you're a Photoshop user, you can now export those panoramic images that Photoshop can create directly to HD View / Deep Zoom format. The Photoshop plug-in is available in both 32-bit and 64-bit. Here's a quote from the HD View website:

About HD View
HD View is a new viewer developed by Microsoft Research's Interactive Visual Media group to aid in the display and interaction with very large images. The HDView development team included Johannes Kopf, Matt Uyttendaele, Howard Good, and Michael Cohen along with Jonathan Fay of the Next Media group.

Recent advances in camera and sensor technology and software for stitching images together has led to the creation of images containing billions of pixels (gigapixels). These images are often panoramic, that is, they cover very wide fields of view. Since monitors typically contain only one to two million pixels, it is only possible to actually see 1/1000th of such image data at once. Also, viewing very wide fields of view require unwrapping of an image projected onto a curved surface (think of a map of the world) which can cause distortions.

HD View leverages current graphics hardware to allow smooth panning and zooming as well as the viewing transformation described below.

HD View was developed with a number of goals in mind. It should:

  • allow smooth panning and zooming on large images,
  • only download enough data to create the current view (and possibly look ahead to the next), and
  • always display the current field of view with an appropriate projection. This means that when zoomed way in you should be presented with a standard perspective projection providing a sense of immersion, and when zoomed out you experience a curved projection so that get a full overview of the scene. In between the projection should smoothly transition.
  • Finally, it should be easy to create your own HD View content and present it to the world via the web.

The HD View plug-in currently supports all major browsers on the Windows platform. The first time that you visit a page with HD View content you will be prompted to install the HD View plug-in.

For more information on HD View / Deep Zoom, follow the links below:

Microsoft Deep Zoom

HD View Utilities (32 bit)

HD View Utilities (64 bit)

Create Android apps with MIT App Inventor for Android

Note: Google turned this project over to MIT, so they are currently maintaining it. The links at the bottom of this article have been changed.

Have you ever had an idea for an Android app but didn't know how to go about creating it? Then MIT App Inventor for Android may be just what you're looking for. The MIT App Inventor for Android is an Integrated Development Environment (IDE) based on Java. It consists of two different interfaces: Designer and Block Editor.

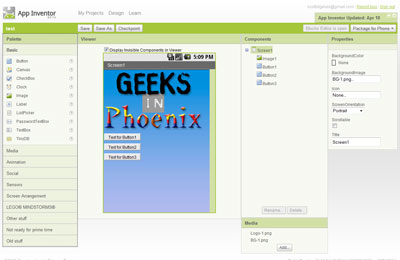
The Designer interface for MIT App Inventor for Android

The Designer interface is where you create the layout for the screen for your app. You drag and drop visual and non-visual components from the Palette to the Viewer (it looks like the display from an Android phone) to assemble the screen. For visualization purposes, a check box allows you to turn on or off the display of non-visible components. A Components list on the right will enable you to select and edit the properties of each of them.

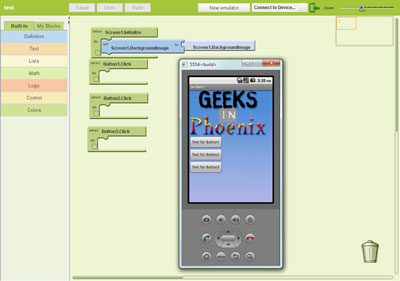
The Blocks Editor interface for MIT App Inventor for Android

The Blocks Editor interface is where you add functionality (programming) to the components you created in the Designer. There are two columns to the left, Built-in and My Blocks, and a design area in the center. You drag and drop different functions from the Built-in and My Blocks to assemble strings of functions. They are color-coded and shaped so that certain functions can only go into relative functions (sort of like a jigsaw puzzle). It's an intuitive interface that is easy to learn. Here's a quote from the MIT App Inventor website:

App Inventor lets you develop applications for Android phones using a web browser and either a connected phone or emulator. The App Inventor servers store your work and help you keep track of your projects.

You build apps by working with:

  • The App Inventor Designer, where you select the components for your app.
  • The App Inventor Blocks Editor, where you assemble program blocks that specify how the components should behave. You assemble programs visually, fitting pieces together like pieces of a puzzle.

Your app appears on the phone step-by-step as you add pieces to it, so you can test your work as you build. When you're done, you can package your app and produce a stand-alone application to install.

If you don't have an Android phone, you can build your apps using the Android emulator, software that runs on your computer and behaves just like the phone.

The App Inventor development environment is supported for Mac OS X, GNU/Linux, and Windows operating systems, and several popular Android phone models. Applications created with App Inventor can be installed on any Android phone. (See system requirements.)

Before you can use App Inventor, you need to set up your computer and install the App Inventor Setup package on your computer.

For more information on MIT App Inventor for Android, follow the links below:

MIT App Inventor for Android

Getting started with MIT App Inventor

Calling on the cloud with Google Voice

If you haven't heard about Google Voice, let me be the first to tell you about it. Google Voice is a telephony service that can be used on any cellular phone and any carrier. Just a Gmail account is required.

The Google Voice web based interface
The Google Voice web-based interface

Google Voice was designed to complement your existing cellular phone carrier. Recently, Google has added Phone Number Porting, which allows you to use Google as your primary carrier. The set of features are vibrant, with all of the usual stuff (personal greetings, voicemail, etc.). And when used inside a web browser, you can make calls from your computer (headphones/speakers and microphone required).

Use Google Voice with Google Talk to make calls from your computer
Use Google Voice to make calls from your computer

For me, the two best features of Google Voice are the free calls within the U.S. and Canada and cheap international calls. Some of my family is in New England and France. Here's a complete list of features:

  • Voicemail transcription to e-mail
  • One phone number that can be ported to multiple phone numbers
  • Personalized voice mail greetings
  • Cheap international calls
  • Block/screen callers
  • Conference calling
  • Mobile app (Android, iPhone, and Blackberry)
  • SMS to e-mail

Here's a quote from the Google Voice website:

Teach your phone new tricks

Google Voice enhances the existing capabilities of your phone, regardless of which phone or carrier you have - for free. It also gives you:

One Number
Use a single number that rings you anywhere.

Online voicemail
Get transcribed messages delivered to your inbox.

Cheap calls
Free calls & text messages to the U.S. & Canada.
Super low rates everywhere else.

For more information on Google Voice, follow the link below:

Google Voice

Free computer diagnostics

Repairing a PC can sometimes be expensive, and that is why we offer free basic in-shop diagnostics. Give one of our professional and experienced technicians a call at (602) 795-1111, and let's see what we can do for you.

Check out our reviews

Geeks In Phoenix LLC, BBB Business Review

Customer service is #1

Here at Geeks in Phoenix, we take pride in providing excellent customer service. We aim to give the highest quality of service  from computer repair, virus removal, and data recovery.

Bring your computer to us and save

Repairing a computer can be time-consuming. That is why we base our in-shop service on the time we work on your computer, not the time it takes for your computer to work! From running memory checking software to scanning for viruses, these are processes that can take some time.

Contact us

If you have any questions, please feel free to give us a call at (602) 795-1111  and talk with one of our Geeks. Or you can send us a message from our contact page contact page , and one of our Geeks will get back to you as soon as possible. Or you can stop by and see us. Here are our hours and location.

Like Geeks in Phoenix on Facebook

Follow Geeks in Phoenix on Twitter

Watch Geeks in Phoenix on YouTube