If you have used Windows before, you are well versed with the Start menu. But did you know that there are other ways to get around inside Windows 11? Let's take a look at the different ways to navigate Windows 11.
In the early versions of Windows, you only had the Program Manager to make your way around Windows. But in 1995, Microsoft released Windows 95 with a new way of navigating Windows, the Start menu.
Over the years, the look of the Start menu has changed. It has had several different Windows logos, flat/rounded/beveled edges, but it always worked the same way.
Then came Windows 8, and Microsoft changed the Start menu. The Start menu was replaced with the Start screen, and navigating Windows would never be the same.
When Windows users complained about the Windows 8 Start screen, Microsoft introduced the Power User menu in Windows 8.1. That made finding the more popular features easier, like Settings, System, and Computer Management.
So when Windows 10 was released, the Start menu came back along with the Power User menu. A few other cool features were added to the Start menu, including the ability to change the accent color of the Start menu.
With Windows 11, Microsoft changed the look and feel of the Start menu, but all of the essential functions are still there. The Start menu layout changed, but the learning curve is really mild.
Windows 11 Start menu
The Start menu is the traditional way of getting around Windows 11. As with every version of Windows, Microsoft has made some changes to its appearance.
With Windows 11, you can change the location of the Start menu to either the center or the left side of the Taskbar. Sadly, you can not change the Taskbar's position to the left, right, or top of the screen.
You can change the same Start menu features in Windows 11 that you could in Windows 10. The only thing I found you cannot do is to change the Start menu's color. You can only change the color mode, light or dark.
All Start menu customizations can be found by going to Settings > Personalization. Here is a list of the features and areas on the Windows 11 Start menu.
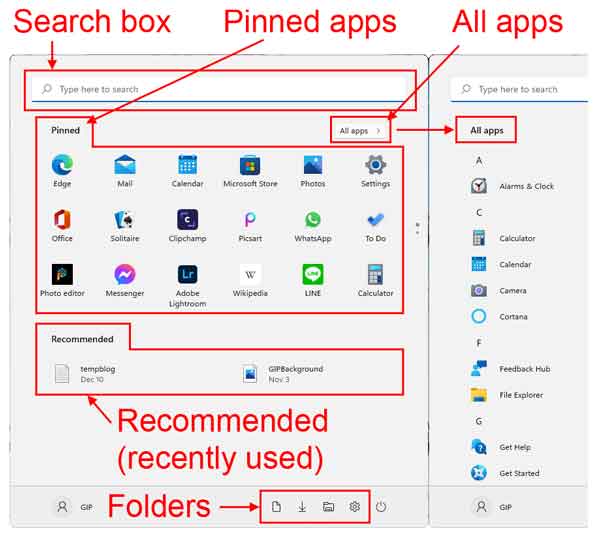
- Search box - Type in the name of the app or file you are looking for.
- Pinned apps - This is a collection of shortcuts to your favorite programs.
- All apps - Here, you will find all of the shortcuts to all of the installed programs.
- Recommended - This is a list of the most recently used files.
- Folders - These are the shortcuts that you select to appear next to the Power button. You can choose which folders appear by going to Settings > Personalization > Start > Folders.
Here is a list of the folders you can have to appear next to the Power button.
- Settings
- File Explorer
- Document
- Music
- Pictures
- Videos
- Network
- Personal folder
Windows 11 Power User Menu
The Power User menu appeared in Windows 8.1 to appease users that were upset with the replacement of the Start menu with the Start screen. Windows 8 was a nightmare to navigate using the Start screen, and the Power User menu made it a little easier.
The Power User menu has shortcuts to the most used features inside of Windows, including System, Settings, and Computer Management. And the cool thing is that you can bring up the Power User menu in two (2) different ways.
- Right-click on the Start button

or
- Press the Windows logo key + X at the same time.
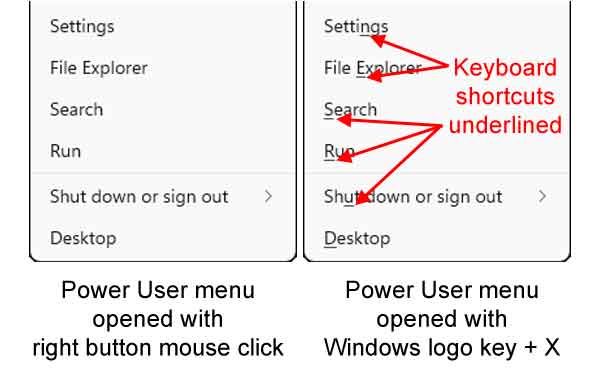
If you use your keyboard to bring up the Power User menu, the different programs and features will have a letter underlined in their name. If you press the corresponding letter, that program or feature opens.
Windows 11 Windows Logo keyboard shortcuts
Back when the Start menu was introduced, Microsoft also added a feature to help navigate Windows using the keyboard. That Windows logo key on your keyboard can do a whole lot more than just bring up the Start menu.
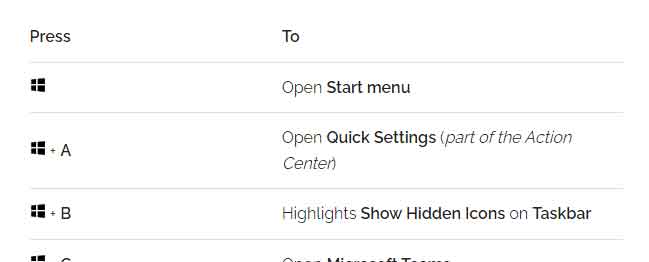
The Windows logo key can open more than fifty (50) Windows 11 programs and features when used with other keys. Some of my personal favorites are:
- Windows logo key + E opens File Explorer
- Windows logo key + R opens the Run dialog box
- Windows logo key + X opens the Power User menu
What makes these Windows logo keyboard shortcuts special to me is that you can use only your left hand to use them. That way, I can keep my right hand on my mouse. Follow the link below for a complete list of the Windows logo key shortcuts for Windows 11 (it opens in a new window).
Windows logo key shortcuts for Windows 11
84970fd3-fa83-4db4-b951-799c7700118e|2|5.0|96d5b379-7e1d-4dac-a6ba-1e50db561b04