Geeks in Phoenix

Geek Blog


Custom cases: Faux Stone and Chalkboard

Here are the pictures of my daughter's finished customized computer case.

Faux Stone and Chalkboard 1Faux Stone and Chalkboard 2

RUST-OLEUM products used

The face is RUST-OLEUM's American Accents 'Sierra' Stone textured finish. The top and sides are RUST-OLEUM's Chalkboard specialty paint.

Pretty sweet, Brittany! Can't wait to see how you decorate it with chalk.

Upgrading your computer cheaply (part 3)

I started by taking the side panels and top off. It was at this point I decided to go excessive. Since most computer peripherals come with black finishes, I decided to change the case's color to black (this is where Home Depot comes into the picture). So I took off the face of the case and gently removed all of the buttons and lights.

A completely empty case.

I then proceeded to install the motherboard, processor/fan assembly, and memory. Next came the expansion card (wi-fi) and onboard connections. Note: Since I have some spare parts, I did install back panel connections for one serial port, one printer port, and four USB ports (for a total of eight on the back). These did not come with the motherboard. Then came the power supply and the drives.

The brand new system.

Here is a photo of the finished system, less the face and sides. I did add two more items into this $164.98 machine. Anybody who knows me knows I'm not particularly eager run onboard video cards. It uses a part of your system memory, which can be detrimental to a system's performance with a small amount of RAM. Say you have a system with 512 MB of RAM, and you have to have 128 MB for your video card. You have now cut your available system memory by 25%. Also, the memory on internal (opposed to onboard) video cards is faster. So I added a Microstar NX-8400GS with 512 MB for $43 and an Antec 80mm Tri-Cool case fan for $5.

So here's what I ended up with:

Intel Celeron 430 1.8 GHz with 4 GB's of DDR2 memory running with an FSB speed of 800 MHz, Microstar video card with an NVidia GeForce 8000 Series GPU with 512 of GDDR2 with a Western Digital 320 GB SATA Hard Drive.

Total for the whole system, $213.97, excluding labor. I will post a picture of the finished case when it's done.

Side note: My younger daughter decided she wanted to change her case too. This one is cool! Faux stone and chalkboard! Stop back by and see how this turns out.

Upgrading your computer cheaply (part 2)

Before we can go shopping, we need to see what we can reuse.

An inside view of the 'old' system.

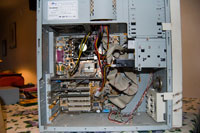
The motherboard and hard drive need to be replaced. The new motherboard will require a new processor and memory. So here's a list of what we can reuse:
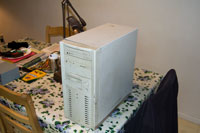
  • Mid-tower case
  • CD-ROM
  • CD-RW
  • Floppy drive
  • Internal wi-fi card
  • Power supply

Usually, you would also have to change out the power supply to accommodate the new motherboard's increased electrical requirements. This power supply was replaced within the last two months, so that it can run the new configuration.

Time to go shopping. We can go online and local retailers. I prefer to go with local retailers, as returning items purchased online can be a hassle. But if you're sure that the possibility of returning the items is slim, it's a great way to get a bargain. The first item is a new motherboard, and what type of CPU (Intel or AMD)?

I'm going with Intel this time. O.K., an Intel processor may not be the most frugal way to go (AMD processors cost less), but for this system, I think it's the way to go. I went looking locally and found a Biostar G31-M7 for $50. It has an LGA775 processor socket. The array of processors available for it is broad.

I found an Intel Celeron 430 1.8 GHz (Retail box) on-line for $35. This is something I am relatively sure I will not have to return. Geek tip: Intel warranties are different for retail (boxed w/ cooling fan - 3 years) and wholesale (no box or cooling fan - 1 year). The price difference is the cost of a cooling fan. So unless you are going to overclock your processor (which requires more cooling than the standard fan provides and voids the warranty), go with the retail version.

I found a deal on memory locally. Got a Corsair twin pack of 2gb DDR2 PC-6400 memory for $50. It came with a $25 mail-in rebate, making the final cost $25 for 4GB of memory.

I also got the hard drive locally. It's a Western Digital 3200AAKS 320 GB SATA hard drive for $52. I could have gone with a smaller size to keep down the cost, but this is the time to think about storage requirements (now and future). The larger the drive, the less the cost per gigabyte.

The total cost at this point is $162 (if you get the feeling I'm not done yet, you'd be right). We have an Intel Celeron 430 running at 1.8 GHz on a Biostar G31-M7 motherboard with 4 GB's of memory. The system has been running on a preinstall environment for over 24 hours and passed several stress tests. So it's time to...

Outside view of the 'old' system.

'Pimp my Box' (sorry MTV, just had to use it).

The next time I write, we'll start building this system and take a trip to Home Depot. (Note: I am going excessive at this point).

Upgrading your computer cheaply (part 3)

Upgrading your computer cheaply (part 1)

Just the other day, I got a call from my daughter about her computer. It was acting strange, so I told her to bring it over. Sure enough, her system is starting to fail. The hard drive has bad sectors, and the motherboard has only one working USB port —a pretty good life for a computer I built nine years ago.

So now I am looking at the options available for upgrading her system. In the next few blog entries, I will give you more insight into the process of undergoing a system upgrade. The options that I am looking at are:

  • Completely brand-new
  • Used / Refurbished
  • Partial rebuilt with new parts

At this time, I would like to explain my two theories on computers:

  1. "Infant Mortality" is the belief that if it runs for a day (24 hours), it will run for its lifetime.
  2. A computer "Lifetime", from my experience, is three years from the start of service. At three years or older, it's not if it will break down, but when will it break down. Just like a car, the older it gets, the more repairs it will need.

With these in mind, you can see where a used system over three years old would not be recommended but can come in handy in an emergency. Refurbished systems can be good deals, but remember, they have been returned to the manufacturer and had something repaired. They still have their full warranty, software, and documentation, so a refurbished system may be right for your particular needs.

New systems can be found starting at $299 and up. These systems can come with and without software, so always read the specifications before buying. But if you already have a computer, you already have software too. And in most cases, you can install it on your new system.

Since this article is about upgrading your computer cheaply, I will do it in the most frugal way possible. I will disassemble the system and rebuilt it from the case up.

The next time I write, we'll go shopping for parts.

Upgrading your computer cheaply (part 2)

Dual Monitors

With newer computers having the ability to run multiple displays, here is a ‘Geek Tip’ for those thinking about using two monitors on one computer. There are various scenarios; I am going to describe just a few. I currently have two systems here with dual monitor setups.

Of course, there is the side-by-side scenario, either horizontally or vertically, with the desktop expanded across the monitors. The first thing to consider is having two monitors precisely alike. It’s not necessary, but it is recommended.  With this setup, you can work with a different program on each monitor. Makes copy and pasting a breeze. And you can also stretch a program across both monitors (left monitor has a work area; the right monitor has the tool palette).

This scenario also works well for those with visual impairments that require a magnification utility. You can use a larger monitor as the ‘main’ display and a smaller monitor as the ‘secondary’ display. Using the main display for all standard functions, the secondary display shows a magnified view of the main display. And without the need for matching monitors, you could pick up a cheap used one to run as secondary. Try your local Goodwill, Savers, thrift shop, etc.

Then there is what I like to call the back-to-back scenario, with the monitors on opposing faces of a wall or walls. The keyboard and mouse can be used wirelessly or through a USB cable. Yes, you can run more than one keyboard and mouse on a system, if this helps. In this case, cloning the display across both monitors is required, as the user can only view one monitor at a time.

With this scenario, you can have a presentation monitor (LCD or plasma TV works well) on one wall and a standard monitor at the workstation. The variations on these scenarios are vast, and I hope I have inspired you to look into using dual monitors.

Free computer diagnostics

Repairing a PC can sometimes be expensive, and that is why we offer free basic in-shop diagnostics. Give one of our professional and experienced technicians a call at (602) 795-1111, and let's see what we can do for you.

Check out our reviews

Geeks In Phoenix LLC, BBB Business Review

Customer service is #1

Here at Geeks in Phoenix, we take pride in providing excellent customer service. We aim to give the highest quality of service  from computer repair, virus removal, and data recovery.

Bring your computer to us and save

Repairing a computer can be time-consuming. That is why we base our in-shop service on the time we work on your computer, not the time it takes for your computer to work! From running memory checking software to scanning for viruses, these are processes that can take some time.

Contact us

If you have any questions, please feel free to give us a call at (602) 795-1111  and talk with one of our Geeks. Or you can send us a message from our contact page contact page , and one of our Geeks will get back to you as soon as possible. Or you can stop by and see us. Here are our hours and location.

Like Geeks in Phoenix on Facebook

Follow Geeks in Phoenix on Twitter

Watch Geeks in Phoenix on YouTube