Geeks in Phoenix

Geek Blog


How to clone the drive in your Windows computer

Are you running out of free space on the drive in your computer? Or are you thinking about getting a faster drive for it? If so, cloning the drive in your computer might be just the answer, and here is how to do it.

How to clone the drive in your computer

Note: Drive cloning is a procedure that computer technicians perform regularly. If you do not feel comfortable doing any of the following procedures, please contact a local computer service company like Geeks in Phoenix.

When installing a new drive in your computer, you have two (2) options; you can perform a fresh installation of the operating system and all the programs. Or you can clone the current drive to the new one and preserve the installed operating system and programs.

Since many people do not remember how they installed their programs or where the installation media/software keys may be, cloning their existing drive is the best option. The complexity of cloning a drive depends on the type of drive, the form factor, and the current and new drive interface.

There are several types of drives; the most popular are SSD (Solid State Drive), HDD (Hard Disk Drive), and SSHD (Solid State Hybrid Drive). There are also several different drive interfaces; the most popular are SATA (7 pin connection cable) and M.2 (keyed socket). HDDs and SSHDs use a SATA interface; SSDs can use either SATA or M.2.

Different types of computer drives

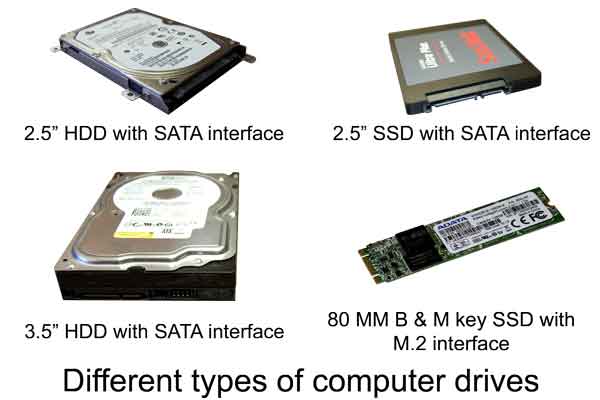
There are several different form factors (physical size) of drives; HDDs and SSHDs come in 3.5" and 2.5" (width), SSDs come in 2.5" (width) when using a SATA interface, and 30 to 110 MM (length) when using an M.2 interface. Drives that come in 2.5" form factor can also have different heights (thicker); 9.5 MM is standard, and 7 MM is used in ultra-thin laptops.

 
Drive types
 
SSD
HDD
SSHD
Form Factor
3.5"
X
X
2.5"
X
X
X
M.2
X
Interface
SATA
X
X
X
M.2
X

If you are upgrading a laptop drive (2.5"), check with the manufacturer on what size is recommended. If you are upgrading an M.2 drive, check with the manufacturer (system/motherboard) on what interface (SATA 3, AHCI, or NVMe), key notch (B, M, or B & M) and length is supported.

Now the first thing you need to do is find out the model number of your current drive. Once you have the model number, you can search on Google and get all of its specifications. You can find the model number in Computer Management.

How to open Computer Management

  1. Left-click on the Start Windows logo menu
  2. Scroll down the list of programs and left-click on Windows Administrative Tools
  3. Left-click on Computer Management

or

  1. Right-click on the Start Windows logo menu to bring up the Power Users menu
  2. Left-click on Computer Management

Once you have the Computer Management console open, left-click on Disk Management and locate the disk that has the partition with the drive letter C:. Right-click the disk number (usually Disk 0) select Properties from the context menu. On the General tab, you will find the drive model number.

Once you have your existing drive specifications, it is time to decide on a replacement drive. Are you going to replace it with one that has the same form factor and interface or not. Your decision will determine how you clone your drive, and there are two (2) ways to do it.

Now it is just a matter of getting another drive with the same data capacity as your existing drive. You can get one with a smaller capacity, but you would have to shrink the partition(s) on the drive before cloning it. You can get one with a larger capacity (recommended), but you may or may not have to manually expand the partition(s) after you are done. Some drive manufacturers (WD, Seagate, and Samsung) cloning software will automatically do that.

There are two (2) different scenarios, upgrading your existing drive to the same form factor and interface or upgrading your existing drive from SATA to M.2. Doing an upgrade that involves just SATA drives is relatively simple; M.2 drives are a bit more complicated.

If you decide to upgrade to an M.2 drive, you will need to find out what type of M.2 drive your motherboard can support before purchasing it. You need to find out the local interface (SATA3, AHCI, or NVMe), width/length, and keying. You will also need the hardware (standoff and screw) to mount it to the motherboard.

SATA drives can be connected to your computer using internal SATA and power cables (desktop) or external USB docking stations / external drive enclosures (desktop or laptop). Since M.2 drives use sockets with PCI-e buses for power and transferring data, they have to be directly connected to the motherboard.

There are M.2 to USB adapters, but they can be expensive and only support specific key notches. For cloning SATA to M.2 or M.2 to M.2, I recommend using the drive-to-image method (see below).

  • Drive-to-drive. This is the method you would want to use if you are cloning your existing drive to another drive with the same interface (SATA to SATA).
  • Drive-to-image. This is the method you would want to use if you are cloning your existing drive to a different interface (SATA to M.2)

Drive cloning software

A few drive manufacturers have the software you can download to clone your drive, but at least one of the drives (source or destination) has to be one of theirs. And a few of the programs you can use to create bootable media. Here are a few of the drive cloning programs available.

Western Digital - Acronis True Image

Seagate - DiskWizard

Samsung - Data Migration

Ultimate Boot CD (bootable media)

R-Drive Image

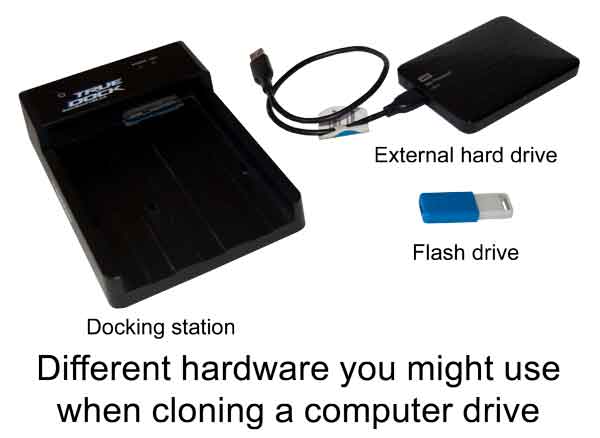
Hardware required for drive cloning

  • Docking station
  • External hard drive
  • Flash drive for creating bootable media

Different hardware you might use when cloning a computer drive

Drive-to-drive cloning

This is probably the easiest way to clone a drive. The first thing you have to do is install the cloning software on the computer with the source drive you want to clone. If you decide to use the UBCD, you will need to create the bootable media.

Then connect the destination drive by either attaching using a docking station / external case (laptop or desktop) or shutting down the computer and installing it (desktop).

Once you have both drives attached to the computer, you can boot the system normally or use bootable media and start the drive cloning program. Follow the software instructions and be ready to shut down your computer as soon as the software completes cloning the drive.

You will need to remove or detach the source drive from the computer, as both of the drives will have the same boot signature. If you cloned a SATA drive to another SATA drive, connect the destination drive to the connection that the source drive was on. You should be ready to boot your computer on the new drive.

Drive-to-image cloning

This procedure does require a few more steps to complete, but it does also have more options. One of the advantages of this type of drive cloning is changing your computer's primary drive interface. The disadvantage is you may have to expand/recreate partitions manually.

The first thing you need to do is install the cloning software on your computer and then create bootable media using it. You will need the bootable media to restore the disk image or disk backup to the new drive.

The next thing you will need to do is use that same cloning program to create a drive image / drive backup of your primary (boot) drive to an external hard drive. Once that is complete, safely remove the external hard drive from your computer and shut it down.

Now that your computer is turned off, uninstall the existing drive and install the new drive. Once the new drive is in place, boot your computer using the bootable media you created and proceed to restore the disk image / disk backup to the new drive.

If the new drive is larger than the old one, the cloning software may prompt you to expand the primary partition. If it does, let the software do it. If not, you may have to expand it manually using Disk Management inside of Windows.

Windows creates a hidden recovery partition right behind the primary partition. If the cloning software does not put that hidden partition at the end of the new drive and expand the primary partition, you will have to do it manually.

I use R-Drive Image for drive cloning, and it allows me to restore a complete drive image or individual partitions. When I run into the hidden recovery partition, I usually will restore all of the partitions except for the last one, the hidden recovery partition.

Since the system does not require the hidden recovery partition to operate, I boot it up on the new drive and expand the primary partition using Disk Management to fill up almost all of the remaining free space.

I leave a little more than enough free space to restore the hidden recovery partition. I then boot the computer back up on the R-Drive bootable media and restore the hidden recovery partition into the remaining free space.

For more information on upgrading computer drives. click on the following links.

How to upgrade the hard drive in your computer

How to upgrade your computers hard disk drive to a solid state drive

Make your computer faster by upgrading the hardware

One of the most frequently asked questions is, "How can I make my computer faster?". It may seem like a simple question, but it does not have a simple answer. Let's take a look at how you can make your computer faster by upgrading the hardware.

Make your computer faster by upgrading the hardware

In previous articles, I have discussed how to use software to speed up a computer. This time around, I will talk about how to get a computer run faster by upgrading the hardware.

Now when it comes down to what makes a computer fast, it boils down to how quickly can all of the different components process data. Let's take a look at all of the parts of a computer that affect the speed and see what we can upgrade.

Note: Some of these upgrades may require complicated disassembly of your computer. If you are not comfortable performing any of these upgrades, please contact a local computer repair service like Geeks in Phoenix.

Motherboard

The motherboard has the most bearing on the performance of a computer. The motherboard bus is what oversees the transferring of data between the various components. The faster the bus speed, the quicker the data travels through the motherboard.

The motherboard bus connects the Central Processor Unit (CPU) to the Northbridge and Southbridge chipsets. The Northbridge handles the graphics bus and memory bus. The Southbridge handles all of the Input/Output (I/O) components, such as SATA and M.2 drives, USB ports, onboard audio, and network adapter. And the speed of the CPU and memory are based on multiplying the bus speed.

Upgrading your motherboard

This is one upgrade that requires serious consideration. If you have a laptop, all-in-one, or a brand name desktop computer (like Dell or HP), a motherboard upgrade is impossible. Only machines that use off-the-shelf components can have the motherboard upgraded.

The first thing to think about is your existing hardware. Will the CPU and memory work on a new motherboard? You would probably get better performance if you upgraded the CPU and memory too.

The second thing to think about is software. You will have to reinstall the operating system and all programs completely. And if you are running Windows, you will also have to get a new product key, as your existing key is bound to your current motherboard.

Technically speaking, you can upgrade any component that attaches to the motherboard and not have to reactivate Windows. Change out the motherboard, and Microsoft sees that as a whole new computer. It is in the EULA (End User License Agreement).

So upgrading the motherboard is probably out of the question. But there are a few other components that you can improve to get better performance from your computer.

CPU

Upgrading a CPU is an excellent way of gaining some speed on a desktop computer. Sorry laptop owners, the majority of laptop computers have the CPU soldered to the motherboard. The same holds for some all-in-one systems too.

Upgrading your CPU

If you are thinking about upgrading the CPU on your motherboard, you will need to do some research. The first thing to do is find the manual/specifications for your motherboard. It would be best if you found out what the CPU socket type it has. For example, Intel CPUs use LGA 1151, LGA 2066, etc. socket types, AMD CPUs use sTRX4, AM4, etc. socket types.

The second thing you will need to do is verify with the motherboard manufacturer what CPUs the BIOS (Basic Input/Output System) supports. Installing a new CPU may require updating the BIOS firmware. And you will need to do this before installing a new CPU.

All of this information should be easy to find on the manufacturer's website. If you can't find it, give them a call. Once you have a list of supported CPUs and the BIOS versions to run them, you should be ready to go.

Remember to get some thermal compound when you order the new CPU. The existing compound will more than likely spread across the current CPU and cooler. Clean off the old compound on the CPU cooler and apply some new compound to the new CPU and then reinstall the cooler.

Memory

Upgrading the memory in a computer has always been the biggest bang for the buck. This applies to all types of machines; laptop, desktop, and all-in-ones. And the majority of the time, it is pretty simple.

I usually recommend looking at the existing memory and seeing how to get the maximum amount in the computer. This time around, I recommend looking at the speed of the current memory, and if you can install faster memory.

Installing faster memory could mean having to replace all of the existing memory modules. But doing that would make your computer run faster. Remember that you can not mix memory of different speeds, they all have to be the same speed and clock timings.

Upgrading your memory

There are three things you will need to find out. The first and most important is what type of memory does your computer take. The majority of computers nowadays can use memory that runs at different speeds. Remember that the memory speed is a multiple of the motherboard bus speed.

The second is memory slots; how much memory can each handle and how many does your computer have. Again, you can find all of this information in the motherboard/system manual. It would be best if you were able to find these on the manufacturer's website.

The third is how to access the memory slots. Getting to the memory slots in a desktop is pretty straightforward. Laptops and all-in-one systems may be tricky. I have seen some MSI laptops that had to be completely disassembled to get to the memory slots.

For more details on memory upgrades, check out the following article.

How to upgrade or add more memory to your computer

Drives

Having a drive that has a fast transfer rate will make a difference with the speed of a computer. Merely upgrading from a Hard Disk Drive (HDD) to a Solid State Drive (SSD) can be a game-changer. You would be amazed at the difference in performance between them.

Now HDDs and some SSDs use a SATA connection on the motherboard. The standard SATA connection has a transfer rate of up to 6 Gigabits per second. An HDD doesn't come close to that transfer rate, but most SSDs do.

And then there is the M.2 drive. It does require a particular slot on the motherboard, as it requires direct channels to the Southbridge chipset. But the transfer rate of 32 Gigabits per second will blow your socks off.

Of all of these recommendations for making your computer faster, this procedure will take the most time. Depending on the upgrade route you choose, the total time can be a few hours to a couple of days.

Upgrading your drive

There are two ways of upgrading your primary boot drive; cloning the existing drive or a fresh installation of the operating system. Each of them has its pros and cons.

Cloning your existing drive

  • Pros: This can be the fastest way of upgrading your drive, and you do not have to reinstall the operating system and programs.
  • Cons: You may run into a problem with resizing partitions and with getting your computer to boot correctly from the new drive.

There are two ways to go about cloning a drive; disk-to-disk or disk-to-image / image-to-disk. If you have a desktop computer, you can do either type of drive cloning. If you have a laptop or all-in-one computer, cloning to an image is the only option. And if you are upgrading from a SATA to an M.2 drive, cloning to an image is recommended.

For more details on disk cloning, check out the following article.

How to upgrade the hard drive in your computer

Fresh (clean) installation

  • Pros: You get a brand-new operating system and programs with that right-out-of-the box experience
  • Cons: This can take some time to get all of the software installed and personal files restored

This is the most time consuming of the two cloning procedures, but it has some significant advantages. What will take the most time is finding all of the software that you will want to reinstall. For more information on performing a clean installation of Windows 10, check out the following article.

How to perform a clean Windows 10 installation

How to upgrade your computers hard disk drive to a solid state drive

Updated September 24, 2020

Most computers (laptop & desktop) nowadays come with a Hard Disk Drive (HDD) as standard equipment with a Solid State Drive (SSD) as an option. Each drive type has its pros and cons: HDD's are cheaper and have more storage, but SSD's are extremely fast (especially when connected to an M.2 slot). So if your existing computer has an HDD, odds are you could replace it with an SSD. Here's how to upgrade your computer hard disk drive to solid-state drive.

How to upgrade your computer's hard disk drive to a solid state drive

I wrote an article not long ago on how to upgrade the hard drive in your computer and refer back to it often. It describes how to clone a smaller drive to a larger one of the same type. Since SSD's typically have less storage than HDD's, this time I'll have to shrink the existing HDD (80 GB) partition(s) down below the capacity of the target SSD (64 GB) before I can clone it.

As in the article mentioned above, the first thing to do is a Checkdisk of the existing HDD. Doing this will ensure there are no errors that may prohibit the cloning of the drive.

Running Checkdisk in Windows Vista / Windows 7

Running Checkdisk in Windows 8

Running Checkdisk in Windows 10

Now we have to start cleaning up the drive. Windows has a built-in tool called Disk Cleanup (cleanmgr.exe) that works pretty well at getting out the clutter. Try using it from an admin command prompt; that way, you'll get more options.

Disk Cleanup Windows 7 / Vista

Disk Cleanup Windows 8

Disk Cleanup Windows 10

Since we are trying to get the maximum amount of free space we can, we will have to delete some files, including documents, photos, videos, etc. Doing a backup right now will ensure we have a copy of all of the files if we need to recover some later.

Windows Vista / Windows 7 Backup

Windows 8 Backup

Windows 10 Backup

The next thing I have to do is find out what is taking up space on the existing HDD. For this, I'll use a copy of Space Sniffer. After a quick view, I see I can free up several gigabytes of space by permanently removing the hibernation file and temporarily deleting the swap file. Windows will warn you about having no swap file, but we will be recreating the swap file once the drive cloning is complete.

Disable Windows hibernation

Managing Virtual Memory / Pagefile in Windows Vista

Managing Virtual Memory / Pagefile in Windows 7

Managing Virtual Memory / Pagefile in Windows 8

Managing Virtual Memory / Pagefile in Windows 10

The next thing we need to do to the drive is to defragment it. I'll use Defraggler from Piriform for this task. Once the drive is defragged, it's time to shrink it. To do this, open Computer Management, expand the Storage section in the left column, and select Disk Management. In the right column, right-click on the partition marked as Boot (usually C:) and select Shrink. Remember to take the size down at least 10-15% below the capacity of the new SSD.

Shrinking a partition down in Windows 7

Once the partition has been resized, it's time to clone the drive. The following article has details on how to clone your hard drive, including links to the cloning software.

How to upgrade the hard drive in your computer

Note: An issue not addressed in the article above is the form factor; the existing SATA HDD is 3.5" form factor, and SATA SSD's are 2.5" form factor.
A desktop hdd and an ssd with adapter brackets
This can easily be resolved by using a pair of 2.5" to 3.5" adapter brackets.

Once the drive cloning is complete, and the system is running again, we need to expand the boot partition to use any free space available. Open Computer Management, expand the Storage section in the left column, and select Disk Management. In the right column, right-click on the partition mark as Boot (usually C:) and select Expand. Once the boot partition has been resized, you can now enable the Windows swap file.

For more information on upgrading computer drives. click on the following links.

How to clone the drive in your Windows computer

How to upgrade the hard drive in your computer

Free computer diagnostics

Repairing a PC can sometimes be expensive, and that is why we offer free basic in-shop diagnostics. Give one of our professional and experienced technicians a call at (602) 795-1111, and let's see what we can do for you.

Check out our reviews

Geeks In Phoenix LLC, BBB Business Review

Customer service is #1

Here at Geeks in Phoenix, we take pride in providing excellent customer service. We aim to give the highest quality of service  from computer repair, virus removal, and data recovery.

Bring your computer to us and save

Repairing a computer can be time-consuming. That is why we base our in-shop service on the time we work on your computer, not the time it takes for your computer to work! From running memory checking software to scanning for viruses, these are processes that can take some time.

Contact us

If you have any questions, please feel free to give us a call at (602) 795-1111  and talk with one of our Geeks. Or you can send us a message from our contact page contact page , and one of our Geeks will get back to you as soon as possible. Or you can stop by and see us. Here are our hours and location.

Like Geeks in Phoenix on Facebook

Follow Geeks in Phoenix on Twitter

Watch Geeks in Phoenix on YouTube