Geeks in Phoenix

Geek Blog


A computer that randomly and frequently freezes up

When it comes to computer repair, you have to be a detective of sorts. And once in a while, I come across a really good mystery. I recently got an HP M7360N in the shop that would randomly freeze-up in Windows XP when you moved the mouse. It would run perfectly fine in Safe Mode. Maybe a bad driver?

A check of the event logs yields absolutely nothing, not a single error. I check Device Manager and find the hard drive controller listed under the Unknown category, even though it is correctly identified as an Intel controller. I uninstall it inside Device Manager and then scan for hardware changes. The hard drive controller reinstalls back into the Unknown category.

The system is still freezing up randomly when the mouse is moved. I tried a PS2 and USB mouse and got the same results with both. I disable all non-essential drivers and reboot with no change. I download the original and latest drivers for the system, trying all with no luck. Maybe a corrupt installation?

I create an image of the hard drive and then wipe it clean. Using the supplied recovery disks, I proceed to re-install the operating system and recovery partition. The system froze-up three times during reinstallation. But this time, the hard drive controller is under the correct category, IDE ATA/ATAPI controllers. It's starting to look like a hardware issue.

I run a few DOS-based utilities to test the memory, hard drive, etc. with no luck. I even try the HP recovery diagnostics. Every test I run tells me that there is nothing wrong with the hardware. Using the keyboard only in Windows, I can install another utility to test all of the motherboard components. I allow it to run for six hours, and the system passes every test.

The BIOS is the next place I look and find it's a few versions older than what is currently available for download. I download and install the latest BIOS version, and it still keeps freezing up randomly when the mouse is moved. I start searching the internet for clues.

After a few different search queries, I come across an article at Badcaps.net discussing symptoms of capacitor failure on motherboards, one being 'system randomly and frequently freezes'. I check the motherboard thoroughly and find no capacitors that look bad. I start checking the expansion (add-in) cards, and all at once, the mystery was solved.

There on the graphics card was a bank of capacitors that the tops were swollen.
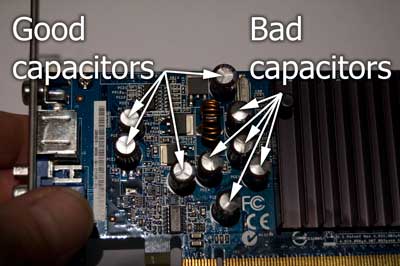
Top view of the graphics card showing the difference between a good and bad capacitors
Top view of the graphics card showing the difference between good and bad capacitors.
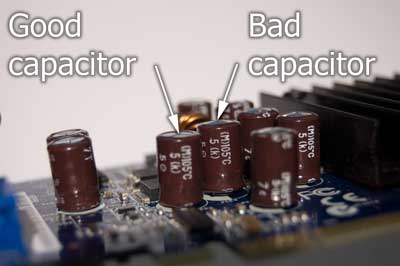
Side view of the graphics card showing the difference between a good and bad capacitor
Side view of the graphics card showing the difference between a good and a bad capacitor.

The movement of the mouse on the screen was causing the graphics card to freeze-up. I re-assembled the system with a new graphics card, and the issue was gone. Another computer repair mystery was solved.

Improve the performance of Windows Vista and Windows 7 with ReadyBoost

I am always looking for different ways to improve the performance of Windows. One of the methods is to use ReadyBoost that is built into Windows 7 and Windows Vista. ReadyBoost can speed up your computer by caching files that the system frequently accesses on USB flash drives and SD / CF memory cards.

Windows 7 and Windows Vista use an algorithm named Windows SuperFetch to determine which files should be stored in the cache. SuperFetch monitors files that users access (including system files, application files, and documents) and pre-loads those files into the ReadyBoost cache. Because the ReadyBoost cache stores a copy of the files, the flash drive can be removed at any point without affecting the computer; Windows will read the original files from the disk.

When to use ReadyBoost to improve performance

  • The computer has a slow hard disk drive. Computers with a primary hard disk Windows Experience Index (WEI) subscore lower than 4.0 will see the most significant improvements.
  • The flash storage provides fast, random, non-sequential reads. Sequential read speed is less critical.
  • The flash storage is connected by a fast bus. Typically, USB memory card readers are not sufficiently fast. However, connecting flash memory to an internal memory card reader might provide acceptable performance.

Requirements for USB flash drives, SD / CF memory cards

  • Capacity of at least 256 MB, with at least 64 kilobytes (KB) of free space.
  • At least a 2.5 MB/sec throughput for 4-KB random reads
  • At least a 1.75 MB/sec throughput for 1-MB random writes

You must reserve at least 256 MB. Larger caches can improve performance, but the ReadyBoost cache in Windows 7 cannot be greater than 4 GB on a FAT32 file system or greater than 32 GB on an NTFS file system. Windows Vista has a 4 GB limit on both file systems. So, if your USB flash drive or SD / CF memory card is larger than 4 GB, it will need to be formatted in NTFS to create a ReadyBoost cache larger than 4 GB.

How to turn ReadyBoost on or off

  1. Plug a USB flash drive or SD / CF memory card into your computer.

  2. Autoplay dialog box with Speed up my system selected
  3. In the Autoplay dialog box, under General options, click Speed up my system.

  4. Drive options for ReadyBoost
  5. In the Properties dialog box, click the ReadyBoost tab, and then do one of the following:
    • To turn ReadyBoost off, click Do not use this device.
    • To use the maximum available space on the flash drive or memory card for ReadyBoost, click Dedicate this device to ReadyBoost. Windows will leave any files already stored on the device, but it'll use the rest to boost your system speed.
  6. To use less than the maximum available space on the device for ReadyBoost, click Use this device, and then move the slider to choose the amount of available space on the device you want to use.
  7. Click OK.

How to clean the dust out of your computer

Living in the desert, the one thing we have a lot of is dust. Dust is a problem since it can block up air vents, heat sinks, and cooling fans inside your computer. Not to mention that dust is a conductor of electricity. It would be best if you cleaned the inside and outside of your computer at least every three months, more often when you live in dusty areas (like Phoenix). I do it monthly, as my primary system is in an open case (Antec Skeleton).

Let's start by turning off the computer and unplugging the power supply. Now, with the system de-energized, we can begin cleaning it. Since this can be messy, I recommend that you do this outdoors. This does mean disconnecting all attached devices/peripherals, but you won't be blowing the dust back into the surrounding area.

*** Note: It is recommended to use a non-metallic utensil, like a wooden skewer, to hold any fan in place as you clean it with compressed air. You want to avoid damaging the fan motor by spinning it too fast. As you clean your computer, check for cooling fans that spin freely with your finger. If you find a fan that is hard to spin, it may have failed and needs to be replaced. ***

First, let's open up the case. If the front panel of your case can be removed safely, go ahead and remove it too. Using a can of compressed air or air compressor and a non-metallic utensil, let's start inside and work our way out.

Typical computer case with front and side panels removed
Typical case with front and side panels removed

Clean the CPU fan & heat sink fins
Clean the CPU fan and heat sink fins

Clean the vents and/or cooling fan on the power supply
Clean the vents and cooling fan on the power supply

If your system has a graphics card, clean the fan and/or heat sink
If your system has a graphics card, clean the fan and heat sink

Clean all heat sinks and open slots

Clean all case fans
Clean all case fans

Clean all openings in case and connection points
Clean all openings in the case and connection points

Once the dust has settled, reassemble the case, re-attach all devices, and you are all done.

Google opens web based Android Market

The one thing I love about my Android-based smartphone is the availability of applications for it. And finding and installing Android applications just got easier. Google has recently opened a web-based version of the Android Market.

The Google Android Market website homepage

The website is clean and easy to navigate, with clearly marked tabs. I found the amount of applications to be the most available for Android based hardware anywhere. I found quite a few that I had never seen on the Verizon version of the Android Market application.

A typical application category list

I browsed through a few categories and found an application to download. Remember that you have to be signed in to your g-mail account associated with your phone to install any applications. I clicked on install and got the following prompt asking for the installation location. I selected my phone and clicked install.

Android Market application installation screen

I got a confirmation that the app would be downloaded to my Android.

Android Market download confirmation screen

I checked my phone and sure enough, on the status bar on top was an icon indicating an app had been installed. A quick check confirmed the installation of the application.

This is, by far, the easiest way to find and install Android applications I have found to date. Hands down the best! If you have an Android powered device, I highly recommend you go over to Google Play and take a look around.

Security made easier with Microsoft Security Essentials 2

In a previous article, I discussed Microsoft Security Essentials (MSE). I like the ease of use, the integration with Windows Update, and the small footprint it has, especially on my netbook. Recently, Microsoft has released Microsoft Security Essentials Version 2 with some new features, including a new and improved protection engine, Windows Firewall integration, and a Network Inspection System.

Microsoft Security Essentials Version 2
A new look for MSE V2

As you can see, the user interface changed slightly, with a new color palette and mesh graphics. There are a few more options for the user to configure, but it is still one of the easiest anti-virus applications to setup. For more on the major improvements, here is a quote from the MSE web site:

Windows Firewall integration
Windows Firewall can help prevent attackers or malicious software from gaining access to your computer through the Internet or a network. Now when you install Security Essentials, the installation wizard verifies that Windows Firewall is turned on. If you have intentionally turned off Windows Firewall, you can avoid turning it on by clearing a check box. You can change your Windows Firewall settings at any time via the System and Security settings in Control Panel.

Network Inspection System
Attackers are increasingly carrying out network-based attacks against exposed vulnerabilities before software vendors can develop and distribute security updates. Studies of vulnerabilities show that it can take a month or longer from the time of an initial attack report before a suitable security update is developed, tested, and released. This gap in protection leaves many computers vulnerable to attacks and exploitation for a substantial period of time. Network Inspection System works with real-time protection to better protect you against network-based attacks by greatly reducing the timespan between vulnerability disclosures and update deployment from weeks to a few hours.

Award-winning protection engine
Under the hood of Security Essentials is its award-winning protection engine that is updated regularly. The engine is backed by a team of antimalware researchers from the Microsoft Malware Protection Center, providing responses to the latest malware threats 24 hours a day.

Now, in going through the program, I did find two options quite interesting...

Microsoft Security Essentials Version 2
Enable behavior monitoring and Enable Network Inspection System options in MSE V2

I did a little digging in the MSE V2 Help file and found this description of these features:

Enable behavior monitoring
This option monitors collections of behavior for suspicious patterns that might not be detected by traditional anti-virus detection methods.

Enable Network Inspection System
This option helps protect your computer against “zero day” exploits of known vulnerabilities, decreasing the window of time between the moment a vulnerability is discovered and an update is applied.

Here are a few of the other changes inside of MSE V2:

  • Microsoft Security Essentials also supports Windows XP Mode in Windows 7
  • The ability to limit CPU usage during scanning
  • Automatic removal of quarantined files after a set amount of time
  • You can now select between monitoring all files, incoming or outgoing

Microsoft Security Essentials Version 2 is available for Windows XP (SP 2 or SP 3)(x86), Windows Vista (x86, x64), and Windows 7 (x86, x64) and can be downloaded here.

Note:
The only issue I came across was that the update function inside Version 1 would not update the program to Version 2. I tried it on a couple of systems without success. I had to uninstall Version 1 first, then install Version 2.

Free computer diagnostics

Repairing a PC can sometimes be expensive, and that is why we offer free basic in-shop diagnostics. Give one of our professional and experienced technicians a call at (602) 795-1111, and let's see what we can do for you.

Check out our reviews

Geeks In Phoenix LLC, BBB Business Review

Customer service is #1

Here at Geeks in Phoenix, we take pride in providing excellent customer service. We aim to give the highest quality of service  from computer repair, virus removal, and data recovery.

Bring your computer to us and save

Repairing a computer can be time-consuming. That is why we base our in-shop service on the time we work on your computer, not the time it takes for your computer to work! From running memory checking software to scanning for viruses, these are processes that can take some time.

Contact us

If you have any questions, please feel free to give us a call at (602) 795-1111  and talk with one of our Geeks. Or you can send us a message from our contact page contact page , and one of our Geeks will get back to you as soon as possible. Or you can stop by and see us. Here are our hours and location.

Like Geeks in Phoenix on Facebook

Follow Geeks in Phoenix on Twitter

Watch Geeks in Phoenix on YouTube